

I’m back with yet another fun stencil tutorial! The theme of this stencil project is “out with the old and in with the new”. Learn how to use stencils to recycle old tacky pillows into new trendy home decor! Cutting Edge Stencils offers a variety of craft stencils to choose from to make your mixing and matching easy. Each craft stencilcomes in a small ($17.95) and medium ($22.95) size so you can also pick the appropriate scale. Don’t forget that after you use a Cutting Edge craft stencil for your pillows you can move on to the next project; these stencils are totally reusable! So what will it be? A piece of furniture? Some stenciled curtains? Stenciled wall art? Think about it, but for now lets focus on the task at hand; stenciling awesome trendy pillow covers : ) As for me, a while back I purchased some chairs for my living room that came with a number of free pillows. I can’t complain about receiving free pillows but the patterns and colors on them just didn’t cut it. I was thinking of just getting rid of them and buying some new ones but when I looked at pillows that I liked most of them were around $50 a pillow and many were upwards of $150 per pillow!!!!! So instead of giving away my old pillows and having to spend $500 on pillows, I up-cycled them with new stenciled fabric covers. If you decide to make a few pillows with the same stencil pattern you can end up spending no more than $17.95. Pretty good deal right?

Zazzle Pillow: $59.95 per pillow

Cutting Edge Stencils pillow $17.95 (reusable so you can make 100 pillows if you want!)
Here is how you can do the same!
What you will need: Cutting Edge Stencils Nagoya Craft Stencil (Small Scale $17.95), Old Pillows (you can also just buy pillow filling and stuff your covers with filling instead of an old pillow, Cutting Edge Stencils 5/8” stencil brush, fabric medium (look for this in the craft paint section of Michaels or any craft store), FolkArt Burnt Orange 1 oz tube acrylic paint (also found at your local Michaels or craft store), scissors, fabric tape measure (I used a strip of fabric) and sewing supplies.

Step 1: Gather your old pillows as well as any fabric you have from various projects over the years. If you don’t have any scrap fabric, you can purchase fabric at great prices from your local Jo-Ann Craft Store. (Note: if your fabric is wrinkled take a minute ti iron) Keep in mind that each fabric reacts to being stenciled with acrylic paint differently. Thinner, more delicate fabrics can tend to get a little stiff so when you use your stencil be sure to compensate by adding a bit more fabric medium to your paint (the point of the medium is to keep the fabric from getting stiff). In my opinion, thicker linens and cotton fabrics are the most stencil friendly but this by no means should deter you from trying out a silk or polyester material just keep my tips in mind!

Step 2: Once you choose which stencil and fabric you want, take your tape measure (I used a make shift tape measure with a strip of fabric) and loosely lay it over the pillow to get the width and height. Note: Be sure not to press down on the pillow when measuring. The idea is to include the curve of the pillow in the measurement. My pillows were all the same size so once I got the measurement for one I was good to go. Feel free to stencil a variety of pillow covers to match pillows of different shapes and sizes. Also keep in mind that if you have a very large pillow you can use a wall stencil instead of the craft size stencils.Once you have the measurements add about an inch to both the height and width so that you have a bit of room for sewing. You want to double the height, mark it out on your selected fabric, cut it out and you are ready to stencil!

3. Next, tape your fabric down to the floor. I chose a pretty thick linen so I wasn’t worried about the paint bleeding through onto the floor. If you are using thin fabric I would recommend putting some kind of protection between your fabric and the floor so that you don’t get paint marks. To do this, just tape the fabric to the protector instead of the floor. Once your fabric is secured, place your stencil on the fabric and tape it down. You want to line your craft stencil up with the top of the of the fabric before you tape it down. Also be aware of the direction your stencil is facing. Make sure that when you sew up the sides of the pillow cover, your stencil pattern will be going in the direction you want.

4. Now it is time to take your 5/8″ stencil brush and begin! With a thicker fabric like the one I chose, you need to get a pretty good amount of paint on your stencil brush to get solid coverage. You don’t need to offload paint in this case (Note: for lighter, thinner fabrics, I would test a small piece to see how much paint you need). I always started my brush in the center of the stencil opening, filled in the center and then worked the edges when most of the paint on my brush had been used up. For more information on how to use a stencil brush please refer to our how to use a stencil brush tutorial.

5. Once you have filled in the stencil. Lift up the left side (make sure the right side is still firmly taped down) and check to see if the paint is even. If you are happy with the way it looks, lift up your stencil. If you notice a few light areas that you would like to make darker, then lay your stencil back down and continue. Note: always lift up a corner of the stencil before un-taping it completely.
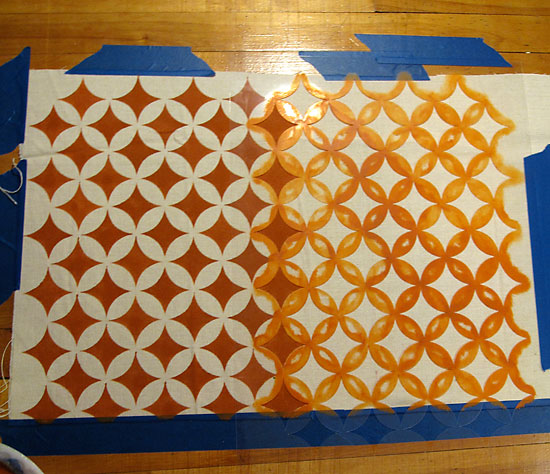
6. To start your next repeat, line the first row of your stencil with the last row of pattern on your fabric. Tape your stencil down and fill it in. Repeat this until you have reached the end of your fabric and then fill in the edges with your stencil.

7. You are finished with the stenciling part. Now you just need to quickly iron it again (place a thin piece of fabric in between to be safe) and sew your new beautiful pillow cover with your pillow inside it : )
Your options with these custom stenciled pillows are endless! You can combine different color fabrics with any paint colors you want to match your furniture and home decor. Revamping your pillows is a fast and easy project that will cost you less than $19.

Cutting Edge Stencils Nagoya Craft Stencil (Small Scale $17.95)

Cutting Edge Stencils Nagoya Craft Stencil (Small Scale $17.95)

Casablanca Craft Stencil (Medium scale $22.95)

Casablanca Craft Stencil (Medium scale $22.95)
Cutting Edge Stencils Hand Forged Craft stencil small scale $17.95

Cutting Edge Stencils Hand Forged Craft stencil small scale $17.95
Thank you for stopping by our tutorial on how to stencil your own pillow covers! Hopefully you learned a thing or two along the way : )
Please keep in touch for new blog posts,
Yours truly,
Gabi & the Cutting Edge Stencil’s Crew
9 comments
[…] She used our craft sized stencils to transform some old pillows into a decorating statement. Stenciling on fabric is so easy! To see how click here. You can also see Benjamin Moore’s Chalkboard paint on the […]
[…] own couch cover! You can then use the same stencil for a number of other DIY projects, like Ikat stenciled pillows, lampshades or a gorgeous feature wall. Looking at the items in the above image you can see a […]
[…] the same as our beehive boxes and just as easy to stencil on! Craft stencils are also great for DIY pillows, curtains and even floor […]
Hi there! This is a really great post! Thanks for sharing! I was wondering how this holds up over time, Does the ironing lock in the colors?
Thanks!
Hi Rachel,
Fabric paints have come a long way so they tend to hold up pretty well these days. We’re not sure if ironing would lock in the color but we haven’t had any complaints about color fade. Hope this helps!
I am wondering if you have any hints for stenciling on a large pre-made cushion. This is my first time trying this!
Hi Michele,
You may want to remove the cushion foam from inside of the cover before stenciling but place a piece of cardboard in there to catch any paint bleed. Start with the corner and continue to reposition the stencil until the cushion is complete.
I am considering stenciling on pre-made white curtains. As a first timer, are there any suggestions? Thanks!
Hi Nece,
First, if your fabric is wrinkled, make sure to iron it first! Tape your fabric to a flat surface (table or floor) so it doesn’t have any wrinkles or move around while you stencil. When stenciling on fabric, spray adhesive can be very helpful. Lightly (and we mean very lightly!! Like spray from at least 6 inches away!) mist your stencil with a spray adhesive, let it dry for a few seconds and place your stencil on your fabric surface, pressing it to achieve a tighter seal. Also, be sure to put something underneath the fabric so it doesn’t leak through to your flat surface! If too much paint is used during stenciling, it may leak through on the other side of the fabric, which may add stiffness to the fabric.
Use stencil brushes (if it is a smaller project) or a dense foam roller for a larger one. Add some textile medium (sold in craft stores) to your stencil acrylics and stir it in well. You can also get special fabric paint but to be honest, good craft acrylics with a dollop of textile medium work just as well and cost less! Use very little paint on your brush and always off load any extra paint onto a folded paper towel. See what I mean here: http://www.cuttingedgestencils.com/how-to-stencil-videos.html#basic
When using a stencil brush, apply the paint with a dabbing/swirling motion. After all of your stenciling is complete, let the stenciled fabric dry completely (at least 24 hours). Then slowly iron the stenciled fabric by pressing the iron for about 20 seconds on a low setting through the piece of soft thin cotton cloth. Heat setting will cure the paint and will help to prevent it from being washed off in the laundry.
*** SIDE NOTE*** It’s always a good idea to first do a test with a sample of your fabric to ensure good results. Do your stenciling, heat set it and wash the swatch to make sure the whole technique works on your fabric. If the paint washes away you may need more heat-setting time, but it usually holds up just fine.
Some fine fabrics will not tolerate heat setting and it’s always more difficult to stencil on sheer fabrics. We’ve stenciled on silk, cotton, linen and even sheer fabrics with great results but’s always better if your fabric doesn’t have too much texture.
Hope this helps! Happy Stenciling!!!