


How to paint a concrete patio
 Welcome! If your concrete patio is looking dull, stained, or just forgotten under all that outdoor furniture, Cutting Edge Stencils is here to show you how to turn it into your new favorite space in the house. This guide walks you through how to paint a concrete patio step-by-step using the same pro-approved approach our team recommends for patios, pool decks, front porches, and even garage floors.
Painting a concrete patio can be a simple DIY concrete patio project when you take the time to prepare the surface properly. With the right paint, tools, and a little patience, you can transform a plain concrete floor into a colorful outdoor space.
Ready to renovate your patio? Let’s get started!
What supplies do you need to paint a concrete patio?

Before you start, gather these materials:
-
Broom or leaf blower
-
Shop vac (optional but helpful)
-
Concrete cleaner/degreaser
-
Pressure washer or hose with a high-pressure nozzle
-
Concrete crack filler
-
Concrete etching solution
-
Scrub brush
-
Gloves and eye protection
-
Concrete repair sealant
-
Painter's tape
-
Concrete primer
-
Exterior concrete floor paint
-
Paint rollers and brushes
-
Extension pole
-
Concrete stencil and stencil tools
-
Exterior clear sealer
Having all your tools ready before you begin makes the process easier and helps you avoid stopping halfway through the project.
What paint should you use on a concrete patio?
For an outdoor concrete surface, choose an exterior concrete floor paint that is specifically formulated for outdoor use. The best paint for concrete patio projects depends on the condition of the surface, the amount of foot traffic it receives, and the manufacturer's recommendations.
BEHR PREMIUM Porch & Patio Floor Paint, for example, is a 100% acrylic paint designed for properly prepared interior and exterior wood and concrete surfaces, including patios and porches.
For your base, you will need exterior concrete floor paint because the surface is outdoors. The paint must be a flat sheen.
When choosing the right paint, always check that the product is intended for concrete and exterior applications. If you're considering epoxy paint, make sure the specific product is rated for outdoor concrete and suitable for your patio conditions.
How to prepare your concrete patio?
Proper preparation is one of the most important parts of outdoor concrete painting. Before you start applying paint, the surface needs to be clean, sound, and ready to accept the coating.
Step 1. Clean the concrete surface

First, sweep away dust, dirt, and loose debris with a broom or leaf blower. If you have patio furniture on the surface, move it out of the way so you can clean the entire area properly. Use a concrete cleaner or degreaser according to the product label to remove dirt, oil, grease, and other contaminants.
Step 2. Check for an existing coating

After cleaning the patio, a moisture test helps ensure concrete is ready for painting. Simply pour a small amount of water onto different areas of the surface.
If the water beads up, your patio has an existing sealer or coating. In that case, remove any loose or peeling patio paint with a scraper and a wire brush. If the water soaks in, it means you are working with bare concrete.
Step 3. Remove old paint or Etch bare concrete

If you are working with bare concrete, use a concrete etching product only if required by your paint or coating manufacturer. Follow the product label for application, dilution, rinsing, and drying instructions before painting.
Wear the PPE specified on the label, never mix cleaners or etching chemicals, and follow all dilution, rinsing, and disposal instructions.
Step 4. Pressure wash and scrub the patio

Next, pressure wash your concrete patio thoroughly. We use a concrete-specific cleaner, following the manufacturer's instructions and diluting Zep Driveway and Concrete Cleaner in a bucket of water.
Then, we use a standard scrub brush to work the cleaner into the surface. The soft yet sturdy bristles help clean the porous concrete deeply and evenly. Once finished, rinse the patio with a pressure washer and let it dry completely before moving to the next step.
Step 5. Repair cracks and rough spots

After the patio dries, fill any cracks or rough spots to obtain a smooth, even surface for stenciling. We used a paintable concrete crack filler or repair product to fill the small cracks and let it dry completely, following the product’s instructions.
For larger cracks or damaged areas, use a concrete repair product that is appropriate for the condition of your patio and follow its recommended curing and drying time before painting.
Step 6. Tape around the patio edges

Apply 2-inch blue painter’s tape around the edges of the patio walls. This will prevent any paint bleeding into unwanted areas.
For stenciling, Cutting Edge Stencils generally prefers a flat or matte base because it dries quickly and helps reduce paint bleed. However, use a coating and sheen approved by the manufacturer for exterior concrete floors.
How to paint a concrete patio?
Once your concrete patio is clean, repaired, and properly prepared, you can begin painting. Follow these steps to apply the primer and concrete patio paint evenly for a smooth base before stenciling.
Step 1. Apply concrete primer

After the patio is clean and ready, apply the primer specified by your concrete-paint system, if required. We used a roller to apply the primer evenly across the patio and a brush to get into the edges and corners, and allowed it to dry completely for about 5 hours.
Step 2. Paint the edges and corners

After applying primer, we used a 2-inch brush to reach the edges and tight spots first. Painting the patio’s perimeter before rolling helps keep paint off the walls. Make sure to paint every corner!
This approach gives you better control around the edges before you move on to the larger sections of the floor.
Step 3. Roll paint across the patio

To cover the entire surface of the concrete patio with paint, we used a ½” nap roller. The half-inch refers to the thickness of the roller’s fibers. The thicker the nap, the better it covers. After it dries completely, apply a second coat if required.
Allow the first coat to dry according to the paint manufacturer's instructions before applying another coat.
Step 4. Use an extension pole
Take care of your back while painting your patio! Attach an extension pole to your roller so you can paint comfortably while standing. If you don’t have one, use a broom or mop handle.
Using an extension pole can make a large patio much more comfortable to paint, especially when the process involves several coats.
How to stencil a concrete patio?

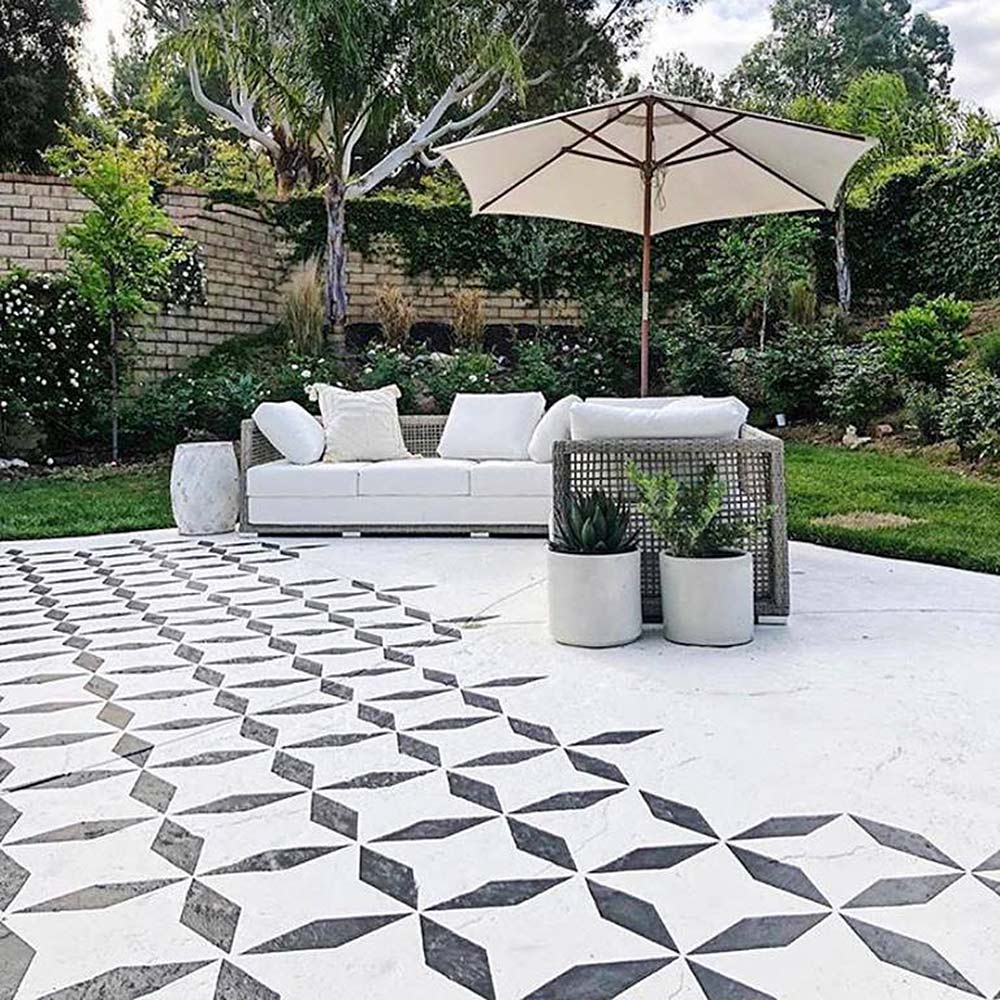
Stenciling brings life and character to your patio. You can create borders, an all-over pattern, or even a special centerpiece design. A concrete patio stencil can also help create the look of decorative tile without removing and replacing the existing concrete surface.


Want a similar look? Choose a patio stencil that fits the scale and style of your space. Whether you're creating faux tile, a Moroccan-inspired pattern, a Spanish look, or a geometric design, stenciling can give a painted patio a completely different appearance.
1. Position and secure the stencil

Pick your favorite concrete stencil design, including Moroccan, Spanish, or geometric styles, all of which work beautifully. Spray repositionable adhesive on the back of your stencil to keep it in place. Start in one corner and work outward, using the stencil’s registration marks for alignment.
2. Apply paint without bleeding

Use a dense foam roller or stencil brush with a small amount of paint for crisp edges. Avoid loading the stencil tool with too much paint. Applying paint in controlled amounts helps minimize bleeding beneath the stencil and gives you cleaner pattern details.
3. Repeat the pattern across the patio

Carefully lift the stencil and move to the next section. Use the registration marks to keep the pattern aligned as you continue across the patio.
Take your time with each repeat. Letting the painted sections become sufficiently dry before working over them can help prevent accidental smudging.
4. Stencil the edges and difficult areas
Edges, corners, and narrow sections can be more difficult to stencil than the middle of the patio. A stencil brush can give you more control in these areas than a roller.
Work carefully around walls and other fixed elements, and use your painter's tape to protect surfaces where needed.
5. Seal the Painted Concrete Patio

Once the paint is completely dry, apply a compatible exterior topcoat or sealer to help protect the painted finish from wear, staining, moisture exposure, and weathering, depending on the product. Use a clear topcoat or sealer specifically approved over your chosen paint and rated for exterior pedestrian concrete.
Painted and sealed concrete may become slippery when wet. For exposed patios, steps, or pool-adjacent surfaces, consider a coating system with appropriate slip resistance and follow the manufacturer's guidance.
For more detailed stenciling tips and techniques, check out our patio stenciling guide!