

Sorry haven’t used it yet
"Sorry haven’t used it yet as my Reno for bathroom hasn’t started yet. But when I use it you will know. Thank you"

Cart
Your cart is empty


Estimated Arrival: 3-5 business days
Free shipping over $100
Highest Quality Stencils
Safe checkout
Made in USA
Free shipping over $100
Highest Quality Stencils
Safe checkout
Made in USA

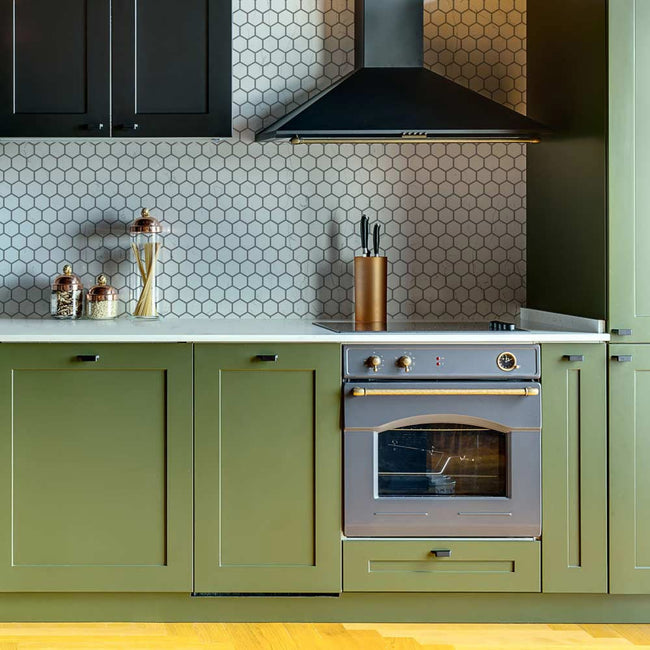
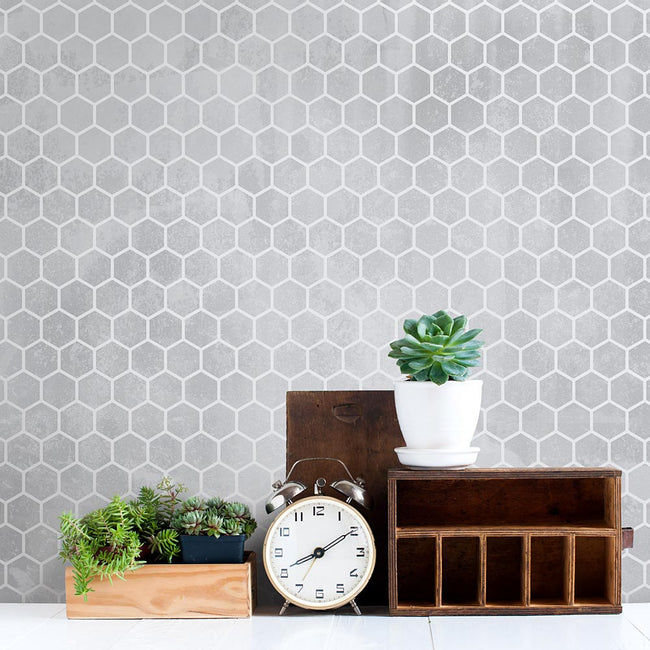
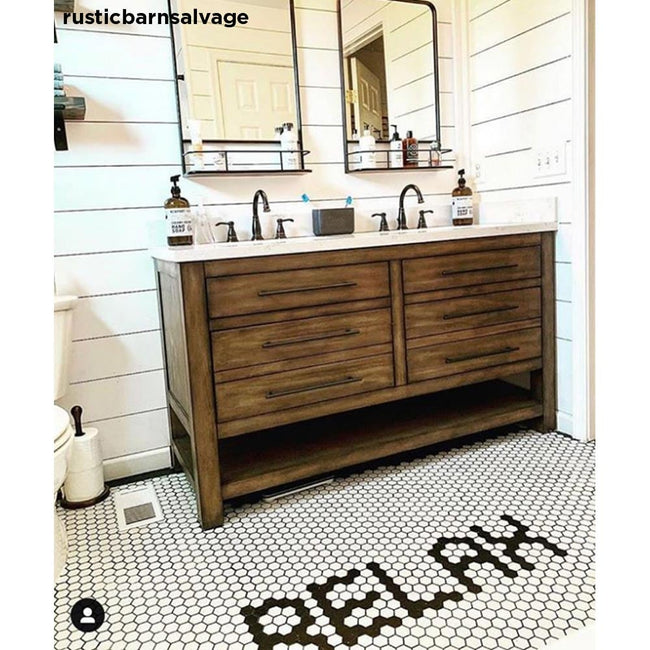
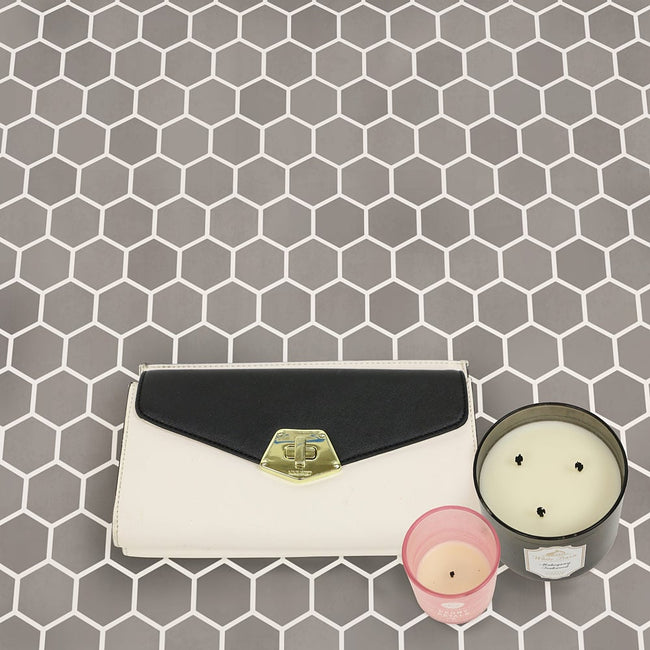
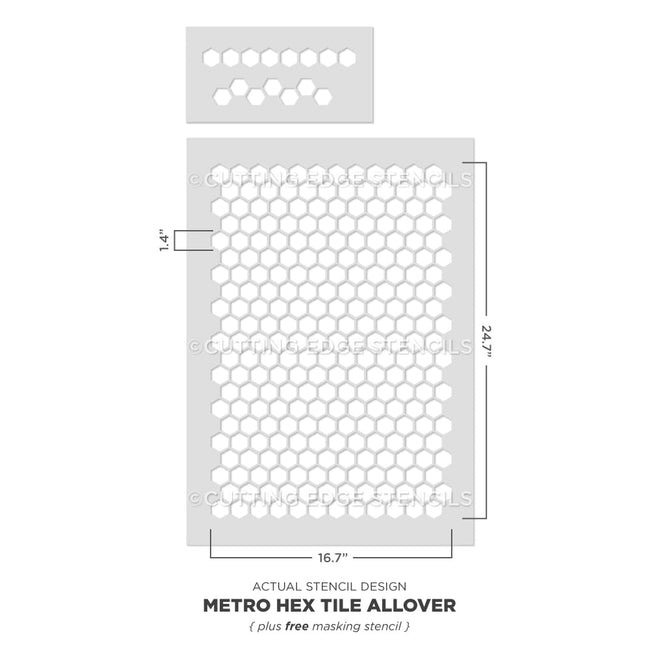
With tile stencils becoming more and more popular, we’re happy to offer this modern geometric Metro Hex Tile Honeycomb Stencil. This honeycomb stencil pattern is perfect for contemporary decor settings, modern bath floors, hallways, painted backsplash and accent walls. It can even be used in a modern nursery. You can get very creative when stenciling a floor with this trendy Hexagon pattern. You can stencil letters, words, shapes and various colors into to your stenciled tile floor. If your painted floor could talk...
While prior stenciling experience is a plus for allover stencil patterns, even beginners get great results!
Try this honeycomb stencil with our new Clip-On Stencil Level, (sold separately) and discover how easy it is to achieve perfectly level results without dealing with all those bulky heavy bubble levels and annoying laser levels.
Want to learn how to stencil a damask or allover pattern? Here are the detailed illustrated step-by-step Damask/Allover Stenciling Tips.
And make sure you watch our short step-by-step Video Tutorials! You'll find them extremely helpful for your stenciling project.
Although our stencils do not require the use of spray adhesive, this stencil could benefit from it to help minimize paint seepage, especially if your walls have a slight texture to them. (Elmer's spray adhesive seems to be the best). Make sure you shake the can well and lightly mist (not drench) the stencil, and let it dry for a moment before positioning it on the wall. This step will prevent the adhesive residue transferring to the wall. You'll need to re-mist the stencil after a few repeats. Note: you will still need to hold the stencil in place with a few pieces of blue painters tape! Adhesive by itself is not enough to hold the stencil on the wall. Clean-up tip: Spray the stencil with Simple Green to help to remove adhesive residue. Please note that once you've used spray adhesive on your stencil, it will never really come off completely. That is why we personally prefer not to use adhesive, and instead use less paint on your roller or stencil brush.
About seepage and imperfections: Even with a proper loaded roller and correct technique you might get some minor paint seepage here and there. In most cases it's not noticeable, especially from a couple of feet away and it can be easily touched up with a small brush. Don't forget that you're creating a "hand-painted wall finish". A few imperfections and some paint seepage here and there are natural and inevitable for this type of work. To avoid seepage, use spray adhesive and less paint on your roller and brush.
Did you know you can stencil your own fabric and use it for curtains, tablecloths, pillows, etc.? When stenciling on fabric, please use stencil adhesive to ensure good results. First, tape your ironed fabric to the surface so it doesn't move around while you stencil. You'll get better results with stencil brushes, but sometimes roller can work too, depending on your fabric. Add some textile medium ( sold in craft stores) to your acrylic paint. You can also get a specially formulated fabric paint, but, frankly, good craft acrylic paint with a dollop of textile medium mixed in works just as well, and costs way less! :) Let the stenciled image dry completely, 24 hours is best, then heat-set it by ironing the fabric for about 20-30 seconds on a LOW setting through the piece of cloth. Heat-setting will cure the paint and will prevent it from being washed off in the washing machine. Always experiment with a sample of your fabric first to ensure good results. We have stenciled on silk, cotton, linen and even sheer fabrics with great results. It's always better if your fabric doesn't have too much texture.
Our stencils are made to last and with proper care and storage will serve you for long time.
USPS can deliver most domestic packages within 3-5 business days (often sooner). For international packages, the delivery time is appr. 7-14 days. For Expedited shipping please select the options at the Checkout. Allow 1 business day for processing of all expedited orders.
30-DAY RETURNS
You can return your unused items within 30 days with no restocking fee. Questions? Please see our full Shipping and Returns Policy.
If you require custom size stencils, please contact us.
Choose options
Estimated Arrival: 3-5 business days
Free shipping over $100
Highest Quality Stencils
Safe checkout
Made in USA
Free shipping over $100
Highest Quality Stencils
Safe checkout
Made in USA
With tile stencils becoming more and more popular, we’re happy to offer this modern geometric Metro Hex Tile Honeycomb Stencil. This honeycomb stencil pattern is perfect for contemporary decor settings, modern bath floors, hallways, painted backsplash and accent walls. It can even be used in a modern nursery. You can get very creative when stenciling a floor with this trendy Hexagon pattern. You can stencil letters, words, shapes and various colors into to your stenciled tile floor. If your painted floor could talk...
While prior stenciling experience is a plus for allover stencil patterns, even beginners get great results!
Try this honeycomb stencil with our new Clip-On Stencil Level, (sold separately) and discover how easy it is to achieve perfectly level results without dealing with all those bulky heavy bubble levels and annoying laser levels.
Want to learn how to stencil a damask or allover pattern? Here are the detailed illustrated step-by-step Damask/Allover Stenciling Tips.
And make sure you watch our short step-by-step Video Tutorials! You'll find them extremely helpful for your stenciling project.
Although our stencils do not require the use of spray adhesive, this stencil could benefit from it to help minimize paint seepage, especially if your walls have a slight texture to them. (Elmer's spray adhesive seems to be the best). Make sure you shake the can well and lightly mist (not drench) the stencil, and let it dry for a moment before positioning it on the wall. This step will prevent the adhesive residue transferring to the wall. You'll need to re-mist the stencil after a few repeats. Note: you will still need to hold the stencil in place with a few pieces of blue painters tape! Adhesive by itself is not enough to hold the stencil on the wall. Clean-up tip: Spray the stencil with Simple Green to help to remove adhesive residue. Please note that once you've used spray adhesive on your stencil, it will never really come off completely. That is why we personally prefer not to use adhesive, and instead use less paint on your roller or stencil brush.
About seepage and imperfections: Even with a proper loaded roller and correct technique you might get some minor paint seepage here and there. In most cases it's not noticeable, especially from a couple of feet away and it can be easily touched up with a small brush. Don't forget that you're creating a "hand-painted wall finish". A few imperfections and some paint seepage here and there are natural and inevitable for this type of work. To avoid seepage, use spray adhesive and less paint on your roller and brush.
Did you know you can stencil your own fabric and use it for curtains, tablecloths, pillows, etc.? When stenciling on fabric, please use stencil adhesive to ensure good results. First, tape your ironed fabric to the surface so it doesn't move around while you stencil. You'll get better results with stencil brushes, but sometimes roller can work too, depending on your fabric. Add some textile medium ( sold in craft stores) to your acrylic paint. You can also get a specially formulated fabric paint, but, frankly, good craft acrylic paint with a dollop of textile medium mixed in works just as well, and costs way less! :) Let the stenciled image dry completely, 24 hours is best, then heat-set it by ironing the fabric for about 20-30 seconds on a LOW setting through the piece of cloth. Heat-setting will cure the paint and will prevent it from being washed off in the washing machine. Always experiment with a sample of your fabric first to ensure good results. We have stenciled on silk, cotton, linen and even sheer fabrics with great results. It's always better if your fabric doesn't have too much texture.
Our stencils are made to last and with proper care and storage will serve you for long time.
USPS can deliver most domestic packages within 3-5 business days (often sooner). For international packages, the delivery time is appr. 7-14 days. For Expedited shipping please select the options at the Checkout. Allow 1 business day for processing of all expedited orders.
30-DAY RETURNS
You can return your unused items within 30 days with no restocking fee. Questions? Please see our full Shipping and Returns Policy.
If you require custom size stencils, please contact us.
Overall rating: 4.928571 / 5 from 14 reviews.
Review topics: [].
"Sorry haven’t used it yet as my Reno for bathroom hasn’t started yet. But when I use it you will know. Thank you"
"This was my first time attempting to stencil. I love the idea and it turned out pretty good. But for my first time stenciling, I may have tried a simpler pattern. The hexagon sizes are very small so it is difficult to have each look identical. Or my suggestion is to practice before you go to work on the area. I like it a lot, I had do a lot of touch ups which was time consuming."
"I haven't had the chance to use my stencil yet as I'm awaiting possession of my new home in a couple of months but the pattern of the stencil is exactly what I've been looking for!"
"I love this hex pattern! I used it on our laundry room floor & I’m really happy with it. My tile floors are not perfectly level so I had some touching up to do, especially around the grout lines, but I love painting so this has been a great diy project!"
"I used the stencil to "tile" my small RV bathroom. The main stencil is bigger than I thought, which gave me a good amount to work with when having to cut a few smaller pieces to fit around really small areas. Plus, it comes with two extra pieces. My only issue was technical, as I didn't figure out a good way to clean off the numerous small spaces of the stencil between passes, so it got caked up, making for more work to clean up than I had thought. I didn't watch a lot of videos before doing it, so maybe there are suggestions for that out there. All in all, I'm very impressed and the results look pretty close to real tile."
"We used this on our front steps and it turned out better than we expected! Barely any bleed and it added some extra character to our home."
"Absolutely beautiful and easy to use."
"Love the way this stencil has made my floor look!"
"I am stuck in Alaska and have very little access to stencils. Cutting Edge products are reasonably priced and they also download instructions in YouTube that make it very easy to use their stencils and paint effectively."
"Love the transformation! Everyone who sees it thinks it’s real tile."

Become a Cutting Edge Stencils insider! Get exclusive promotions, new product launches and sales directly to your inbox!