


Stencils
"The stencils were great and the job turned out marvelous. Our client loved it! Thank you"

Cart
Your cart is empty


Estimated Arrival: 3-5 business days
Free shipping over $100
Highest Quality Stencils
Safe checkout
Made in USA
Free shipping over $100
Highest Quality Stencils
Safe checkout
Made in USA


For expert stenciling tips, please watch our How-to stencil videos! You'll find them extremely helpful for your stenciling project. Even beginners get great results!
Although most of our stencils do not require the use of spray adhesive, if your walls have a texture to them, it might be a good idea to use spray adhesive to help minimize paint seepage (Elmer's spray adhesive seems to be the best). Make sure you shake the can well and lightly mist (not drench) the stencil, and let it dry for a moment before positioning it on the wall. This step will prevent the adhesive residue transferring to the wall. You'll need to re-mist the stencil after a few repeats. Note: you will still need to hold the stencil in place with a few pieces of blue painters tape! Adhesive by itself is not enough to hold the stencil on the wall. Clean-up tip: Spray the stencil with Simple Green to help to remove adhesive residue and let it sit for a while before cleaning with soap and water. Please note that it is virtually impossible to get rid of all adhesive residue. That's why we personally prefer not to use it and just stick with painter's tape!
Stenciling on rough or textured walls may contribute to increased paint bleed. For more information on stenciling on textured walls, see our F.A.Q. section.
About seepage and imperfections: Even with a proper loaded roller and correct technique you might get some minor paint seepage here and there. In most cases it's not noticeable, especially from a couple of feet away and it can be easily touched up with a small brush. Don't forget that you're creating a "hand-painted finish". A few imperfections and some paint seepage here and there are natural and inevitable for this type of work. To avoid seepage, use spray adhesive and less paint on your roller and brush.
Our stencils are made to last and with proper care and storage will serve you for long time.
USPS can deliver most domestic packages within 3-5 business days (often sooner). For international packages, the delivery time is appr. 7-14 days. For Expedited shipping please select the options at the Checkout. Allow 1 business day for processing of all expedited orders.
30-DAY RETURNS
You can return your unused items within 30 days with no restocking fee. Questions? Please see our full Shipping and Returns Policy.
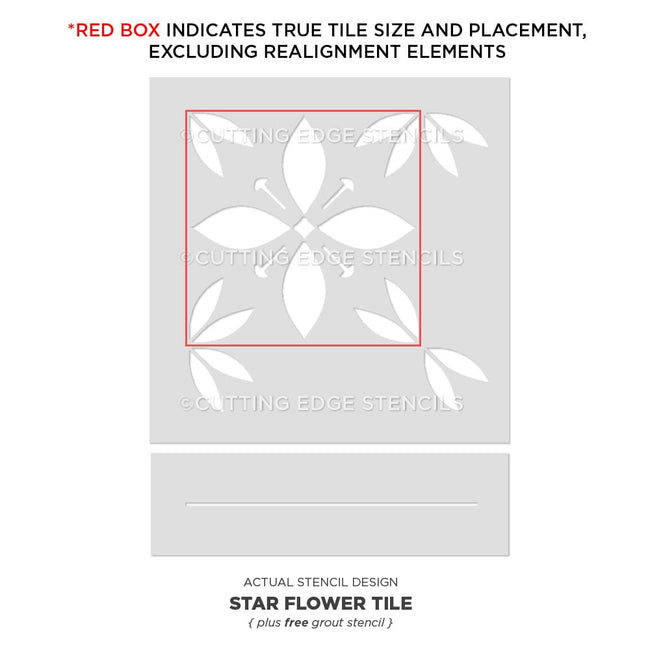
If you require custom size stencils, please contact us.
Choose options
Estimated Arrival: 3-5 business days
Free shipping over $100
Highest Quality Stencils
Safe checkout
Made in USA
Free shipping over $100
Highest Quality Stencils
Safe checkout
Made in USA
For expert stenciling tips, please watch our How-to stencil videos! You'll find them extremely helpful for your stenciling project. Even beginners get great results!
Although most of our stencils do not require the use of spray adhesive, if your walls have a texture to them, it might be a good idea to use spray adhesive to help minimize paint seepage (Elmer's spray adhesive seems to be the best). Make sure you shake the can well and lightly mist (not drench) the stencil, and let it dry for a moment before positioning it on the wall. This step will prevent the adhesive residue transferring to the wall. You'll need to re-mist the stencil after a few repeats. Note: you will still need to hold the stencil in place with a few pieces of blue painters tape! Adhesive by itself is not enough to hold the stencil on the wall. Clean-up tip: Spray the stencil with Simple Green to help to remove adhesive residue and let it sit for a while before cleaning with soap and water. Please note that it is virtually impossible to get rid of all adhesive residue. That's why we personally prefer not to use it and just stick with painter's tape!
Stenciling on rough or textured walls may contribute to increased paint bleed. For more information on stenciling on textured walls, see our F.A.Q. section.
About seepage and imperfections: Even with a proper loaded roller and correct technique you might get some minor paint seepage here and there. In most cases it's not noticeable, especially from a couple of feet away and it can be easily touched up with a small brush. Don't forget that you're creating a "hand-painted finish". A few imperfections and some paint seepage here and there are natural and inevitable for this type of work. To avoid seepage, use spray adhesive and less paint on your roller and brush.
Our stencils are made to last and with proper care and storage will serve you for long time.
USPS can deliver most domestic packages within 3-5 business days (often sooner). For international packages, the delivery time is appr. 7-14 days. For Expedited shipping please select the options at the Checkout. Allow 1 business day for processing of all expedited orders.
30-DAY RETURNS
You can return your unused items within 30 days with no restocking fee. Questions? Please see our full Shipping and Returns Policy.
If you require custom size stencils, please contact us.
Overall rating: 5.0 / 5 from 4 reviews.
Review topics: [].
"The stencils were great and the job turned out marvelous. Our client loved it! Thank you"
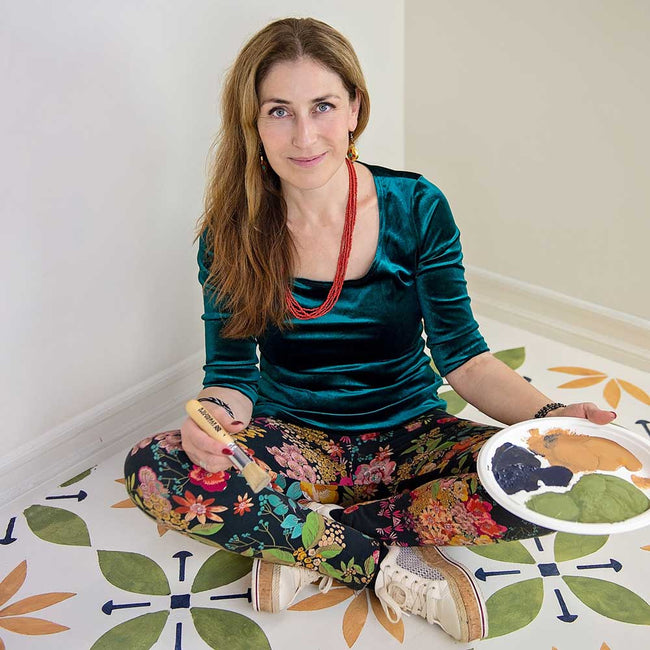
"Wow what a fabulous product and company! After getting a bid for $1500 to tile my 8X6 Laundry Room, I went to see my friends hallway she stenciled 5 years ago that still looked great! I thought I can do this, I have painted walls in my homes for years. The hardest part was choosing my pattern and color! I did do one step wrong, I painted the floor with the same satin wall paint. I missed in the directions flat paint for everything but the primer. After calling Erica @ CES she talked me off the ledge and said I would be ok. The reasoning for flat paint is less bleed from the stencil. In the end I was happy I had satin painted on the floor bc though I tried very hard to keep the floor as clean as possible using parchment paper to sit and walk around the room, sometimes my foot missed the paper and my shoes hit the white paint and it was easy to clean off my dirty shoe prints! Not sure flat paint would have been as forgiving. Erica was also very nice and answered all my questions about the final poly coat which I was very nervous about. I did use sticky tack cloth on a mop to clean the floor really well after a very careful vacuum to not scratch the stencil. Use a foam roller and work in small sections. Total stencil time took me 12 hrs. Over 3 days. It’s hard on the knees and back. I worn clean knee pads in the corners. Everyone who sees my floor thinks it’s tile…Bam just what I was going for, for $165 not a bad savings! Thx Cutting Edge 😍"
"This is a beautiful new stencil. I am in the process of painting an outdated wine colored tile floor in a Master bathroom. The floor is now white & the stencil will be black. I am so excited to see the finished product. These stencils update floors to a new level & make an eye catching subtle impact."
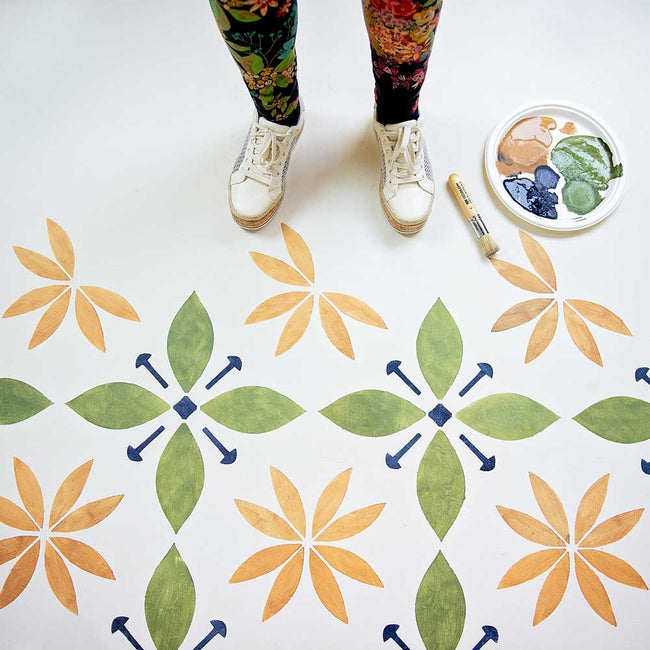
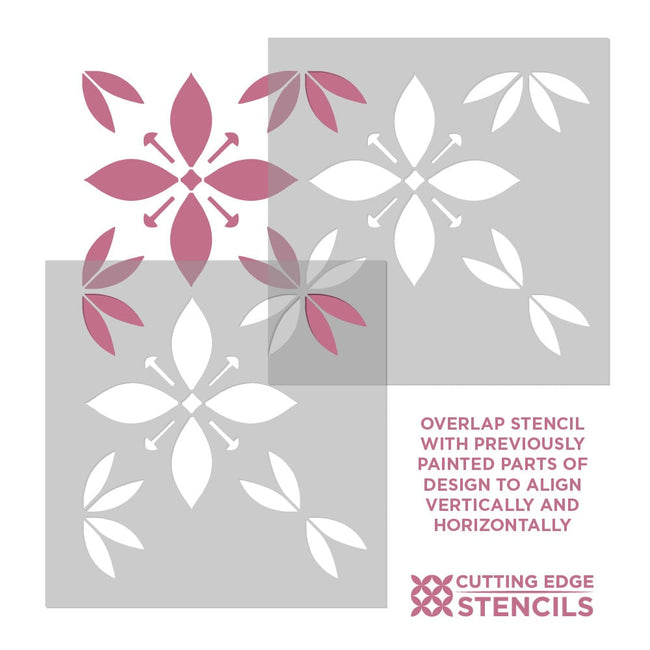
"I’ve never tried stenciling before, but was feeling confident after watching the video showing how to do a patio. I decided to paint a “rug” in our courtyard, rather than going edge to edge of the concrete. We measured and taped out the area, then started painting. (I had to do a bunch of patching on the 30-year-old pad before I could start the fun part. ) I was really ambitious because I wanted it to mimic a rug — so it’s 4 colors on top of the base. That made it pretty time-consuming, but worth it! The details in the stencil design + different colors made it hard to use even a tiny roller, so I used 4 different sized brushes. I did two stencils at a time, which made it more efficient. All total, I estimate the painting took me ~45 hours. Something to note: even though the registration marks work great, there was going to be some “drift” over such a large area. The pre-painted base wound up being a little smaller than the number of repeats we’d planned for, so I just improvised on the last border :) Notes on materials: Spray adhesive is your best friend! It let me line everything up just right, then tack it into place. Also, this project used less than one quart of paint for each of the colors. The indigo and turquoise were close to the bottom by the end but I have lots of red and green left."

Become a Cutting Edge Stencils insider! Get exclusive promotions, new product launches and sales directly to your inbox!