


Just amazing!
"Loved the stencil & all the other stencils I have purchased . Topnotch"

Cart
Your cart is empty

Estimated Arrival: 3-5 business days
Free shipping over $100
Highest Quality Stencils
Safe checkout
Made in USA
Free shipping over $100
Highest Quality Stencils
Safe checkout
Made in USA


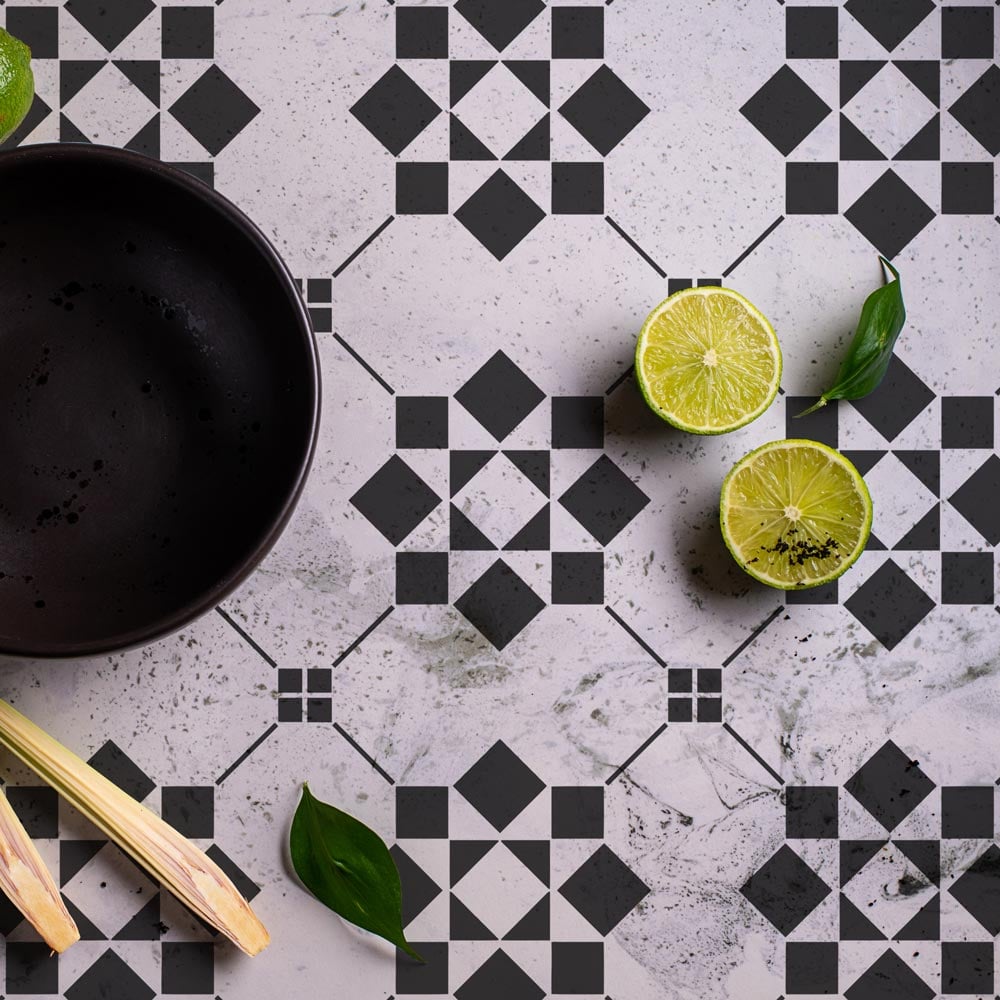
Our Cheshire Tile Stencil was inspired by the beautiful bespoke geometric English floor tile patterns that you see at front entrances and in hallways in England. Reusable tile stencils are the perfect money saving alternative to the popular but pricey cement tiles. Yes, you can paint your old tile without the hassle of ripping it out! You just have to use the proper paint, primer and top coat and your stenciled tile will last for years. Talk about savings! This geometric tile stencil design looks fabulous on floors, accent walls, fireplaces, and even kitchen backsplashes. Our tile stencil designs are super easy to use and provide big savings when compared to more costly alternatives like designer wallpaper or cement floor tiles. Get a Pinterest-worthy tile floor for a fraction of the price of installing real tile! This stencil design will definitely make a statement in your space! Learn How to stencil tile – it’s so easy even for beginners!
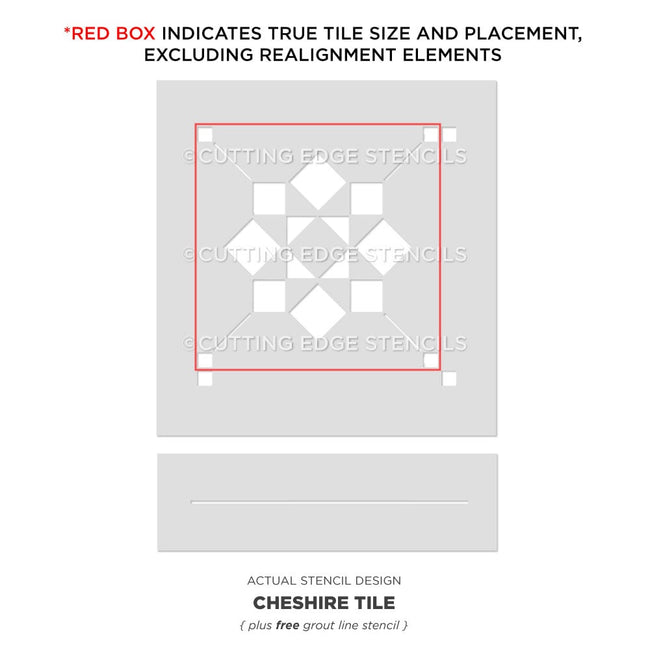
How to measure your tile: The size of our tile stencil designs are exactly as advertised. We currently offer them in 6", 8", 12", and 16". The grout line is NOT factored into those sizes. Before ordering, please measure your tile from tile edge to tile edge. Do NOT include the grout lines. If your tile is slightly larger/smaller than our listed dimensions, please contact customer service using Contact form.
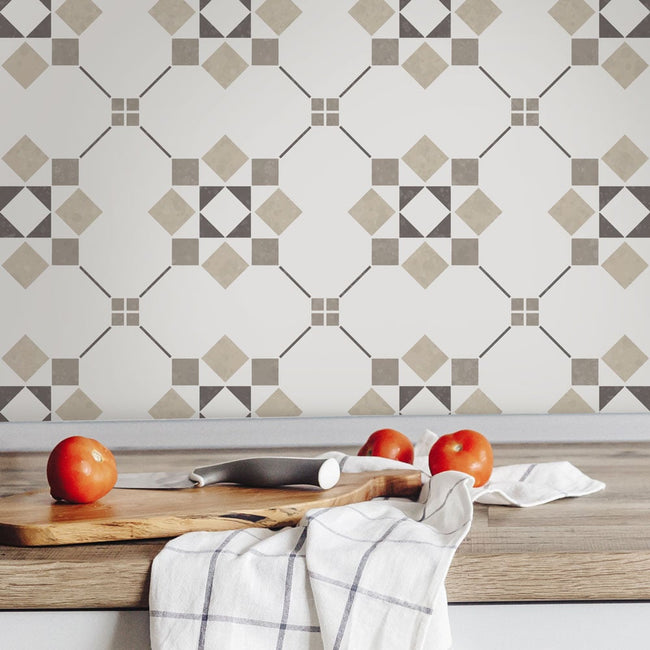
Larger tiles are best for the stenciled floors, but will look great on a wall too. Use smaller tiles for the backsplashes and stenciled stairs.
We also include a free Grout Line stencil to give your stenciled tiles that sharp, clean look!
Learn How to stencil a tile – it’s easy even for beginners!
We recommend purchasing two tile stencils for your project. Not only it will go faster, but you'll be able to get into tighter places and corners by cutting your spare tile stencil. You can certainly bend your stencil and still get to all the tight spots, but you know what we're sayin' - having two stencils makes your life much easier! :)
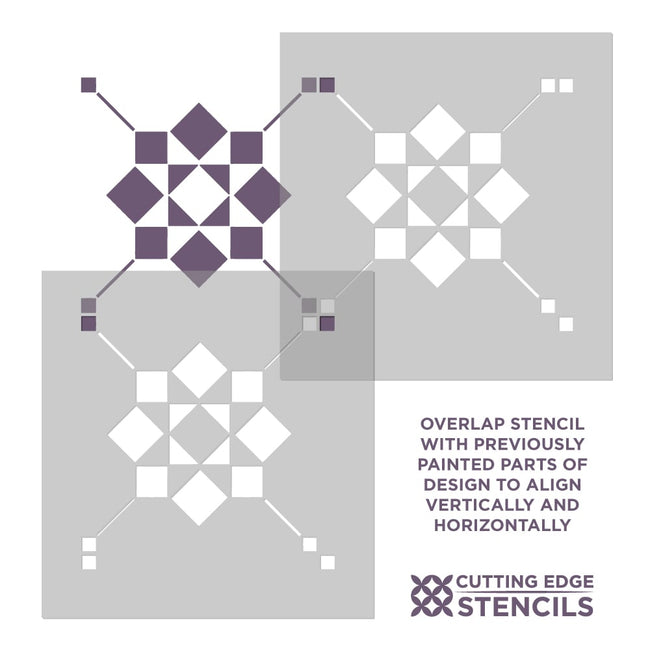
About registration marks: you can use them to align your tile stencil repeats, or not! It really depends on what surface you're stenciling. When stenciling over an existing old tile, the registration marks might not be helpful as the grout width varies from floor to floor. In this case, simply mask out the registration marks with pieces of blue tape, and align the stencil by eye by centering it on each old tile. If you are stenciling over a wall, or linoleum/cement floor - please use registration marks for easy alighnment of your tile stencil. Please see our alignment pic for reference.
Which stencil paint to use? You can stencil with acrylic or latex paint, stencil creams, glaze, etc. It's best to have your walls painted in flat latex paint as it makes a perfect base coat for stenciling. For stenciling on tile floors, use Stix adhesive primer as your base coat, tinted to the color of your choice and then stencil with latex or acrylics as usual. Seal your stenciled tile floor with 2 coats of acrylic polyurethane.
We do not recommend oil paint or spray paint for stenciling. Use a dense foam roller or stencil brush. If you want nice crisp edges, using spray adhesive may be very helpful (Elmer's seems to be the best) to ensure minimal bleed.
The main rule of stenciling is to use less paint! Please take care not to over-load your roller or brush with paint and not to press hard on a roller while stenciling. Always blot off the extra paint onto a folded paper towel before rolling over the stencil.
Please make sure you watch our short step-by-step Video Tutorials! You'll find them extremely helpful for your stenciling project.
About seepage and imperfections: Even with a proper loaded roller and correct technique you might get some minor paint seepage here and there. In most cases it's not noticeable, especially from a couple of feet away and it can be easily touched up with a small brush. Don't forget that you're creating a "hand-painted wall finish". A few imperfections and some paint seepage here and there are natural and inevitable for this type of work. To avoid seepage, use spray adhesive and less paint on your roller and brush.
Our stencils are made to last and with proper care and storage will serve you for long time.
USPS can deliver most domestic packages within 3-5 business days (often sooner). For international packages, the delivery time is appr. 7-14 days. For Expedited shipping please select the options at the Checkout. Allow 1 business day for processing of all expedited orders.
30-DAY RETURNS
You can return your unused items within 30 days with no restocking fee. Questions? Please see our full Shipping and Returns Policy.
If you require custom size stencils, please contact us.
Choose options
Estimated Arrival: 3-5 business days
Free shipping over $100
Highest Quality Stencils
Safe checkout
Made in USA
Free shipping over $100
Highest Quality Stencils
Safe checkout
Made in USA
Our Cheshire Tile Stencil was inspired by the beautiful bespoke geometric English floor tile patterns that you see at front entrances and in hallways in England. Reusable tile stencils are the perfect money saving alternative to the popular but pricey cement tiles. Yes, you can paint your old tile without the hassle of ripping it out! You just have to use the proper paint, primer and top coat and your stenciled tile will last for years. Talk about savings! This geometric tile stencil design looks fabulous on floors, accent walls, fireplaces, and even kitchen backsplashes. Our tile stencil designs are super easy to use and provide big savings when compared to more costly alternatives like designer wallpaper or cement floor tiles. Get a Pinterest-worthy tile floor for a fraction of the price of installing real tile! This stencil design will definitely make a statement in your space! Learn How to stencil tile – it’s so easy even for beginners!
How to measure your tile: The size of our tile stencil designs are exactly as advertised. We currently offer them in 6", 8", 12", and 16". The grout line is NOT factored into those sizes. Before ordering, please measure your tile from tile edge to tile edge. Do NOT include the grout lines. If your tile is slightly larger/smaller than our listed dimensions, please contact customer service using Contact form.
Larger tiles are best for the stenciled floors, but will look great on a wall too. Use smaller tiles for the backsplashes and stenciled stairs.
We also include a free Grout Line stencil to give your stenciled tiles that sharp, clean look!
Learn How to stencil a tile – it’s easy even for beginners!
We recommend purchasing two tile stencils for your project. Not only it will go faster, but you'll be able to get into tighter places and corners by cutting your spare tile stencil. You can certainly bend your stencil and still get to all the tight spots, but you know what we're sayin' - having two stencils makes your life much easier! :)
About registration marks: you can use them to align your tile stencil repeats, or not! It really depends on what surface you're stenciling. When stenciling over an existing old tile, the registration marks might not be helpful as the grout width varies from floor to floor. In this case, simply mask out the registration marks with pieces of blue tape, and align the stencil by eye by centering it on each old tile. If you are stenciling over a wall, or linoleum/cement floor - please use registration marks for easy alighnment of your tile stencil. Please see our alignment pic for reference.
Which stencil paint to use? You can stencil with acrylic or latex paint, stencil creams, glaze, etc. It's best to have your walls painted in flat latex paint as it makes a perfect base coat for stenciling. For stenciling on tile floors, use Stix adhesive primer as your base coat, tinted to the color of your choice and then stencil with latex or acrylics as usual. Seal your stenciled tile floor with 2 coats of acrylic polyurethane.
We do not recommend oil paint or spray paint for stenciling. Use a dense foam roller or stencil brush. If you want nice crisp edges, using spray adhesive may be very helpful (Elmer's seems to be the best) to ensure minimal bleed.
The main rule of stenciling is to use less paint! Please take care not to over-load your roller or brush with paint and not to press hard on a roller while stenciling. Always blot off the extra paint onto a folded paper towel before rolling over the stencil.
Please make sure you watch our short step-by-step Video Tutorials! You'll find them extremely helpful for your stenciling project.
About seepage and imperfections: Even with a proper loaded roller and correct technique you might get some minor paint seepage here and there. In most cases it's not noticeable, especially from a couple of feet away and it can be easily touched up with a small brush. Don't forget that you're creating a "hand-painted wall finish". A few imperfections and some paint seepage here and there are natural and inevitable for this type of work. To avoid seepage, use spray adhesive and less paint on your roller and brush.
Our stencils are made to last and with proper care and storage will serve you for long time.
USPS can deliver most domestic packages within 3-5 business days (often sooner). For international packages, the delivery time is appr. 7-14 days. For Expedited shipping please select the options at the Checkout. Allow 1 business day for processing of all expedited orders.
30-DAY RETURNS
You can return your unused items within 30 days with no restocking fee. Questions? Please see our full Shipping and Returns Policy.
If you require custom size stencils, please contact us.
Overall rating: 5.0 / 5 from 1 reviews.
Review topics: [].
"Loved the stencil & all the other stencils I have purchased . Topnotch"

Become a Cutting Edge Stencils insider! Get exclusive promotions, new product launches and sales directly to your inbox!