


Would order again
"I go this stencil quickly and used it to stamp ceramic tile for a trivet. The lines came out very clean. The stencil cleaned up easily."

Cart
Your cart is empty


Estimated Arrival: 3-5 business days
Free shipping over $100
Highest Quality Stencils
Safe checkout
Made in USA
Free shipping over $100
Highest Quality Stencils
Safe checkout
Made in USA


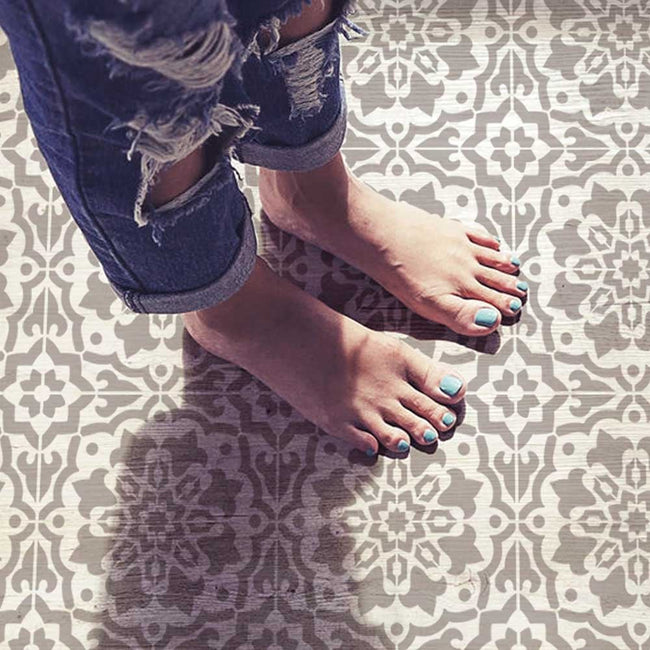
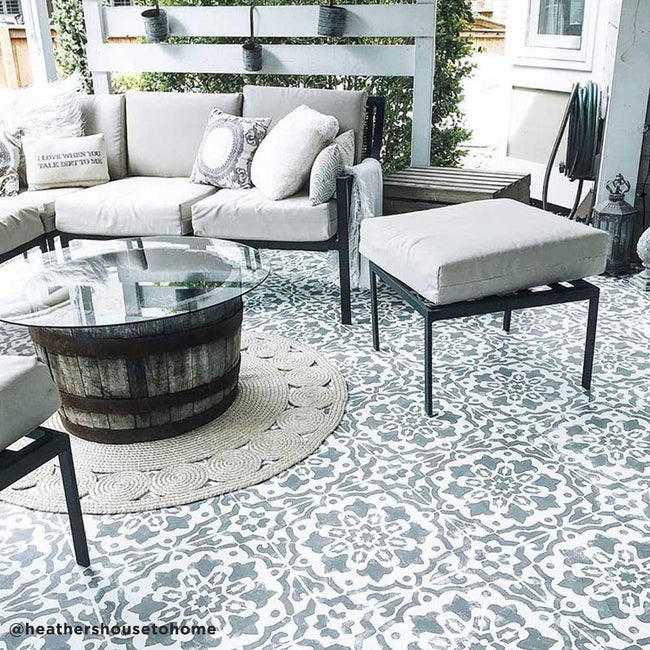
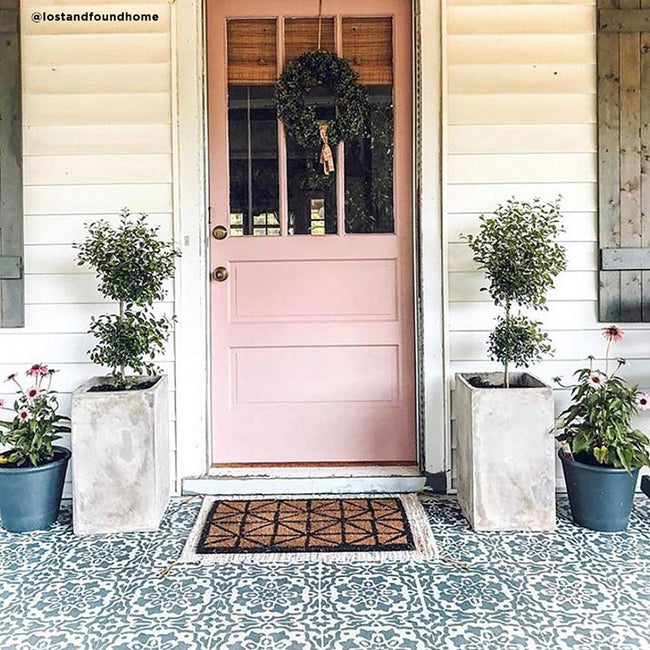
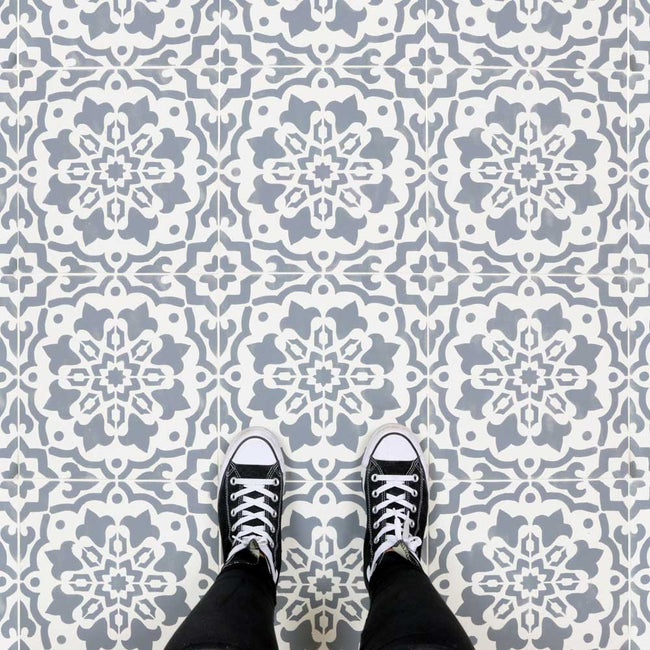
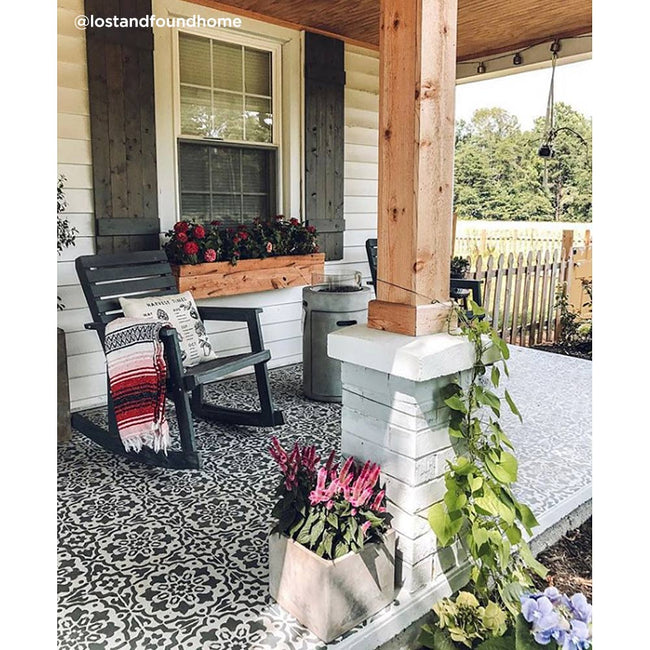
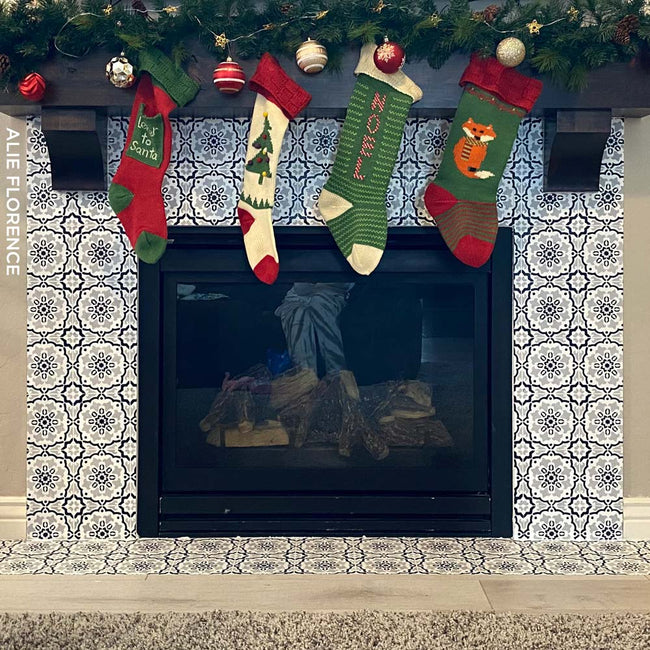
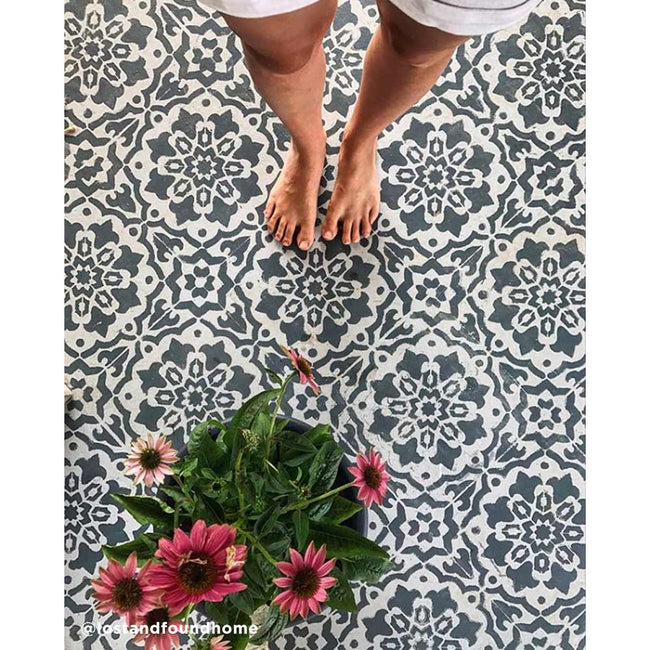
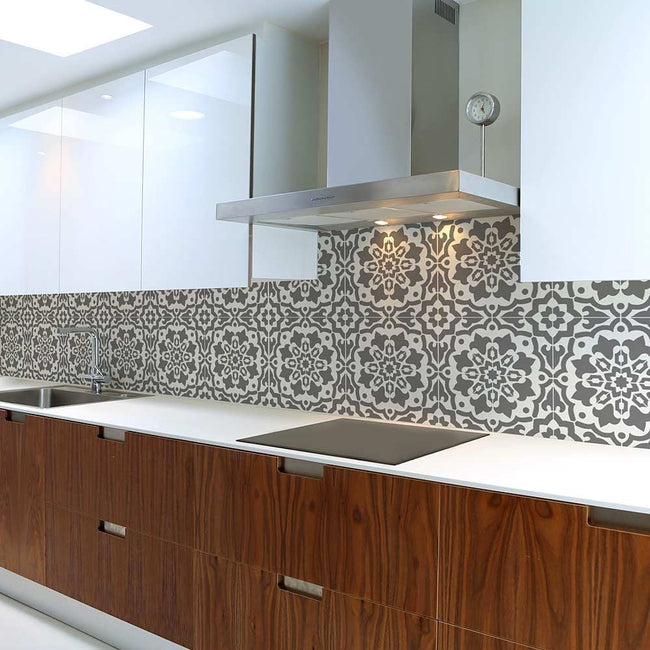
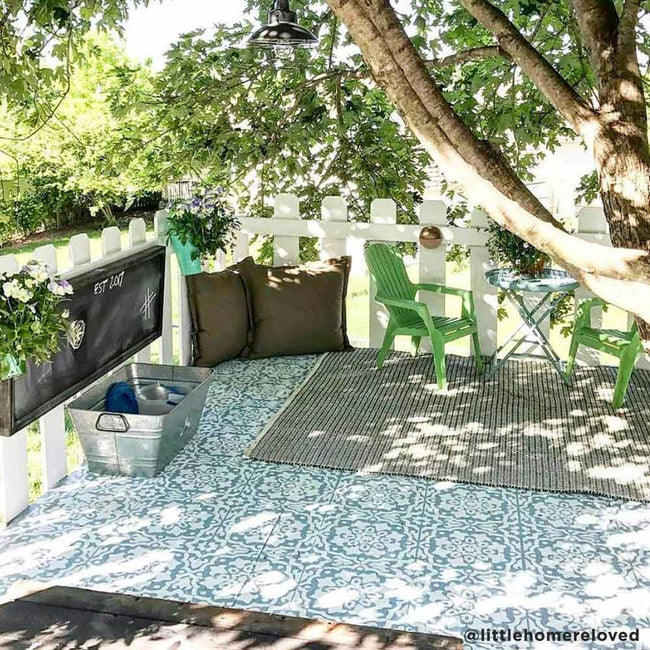
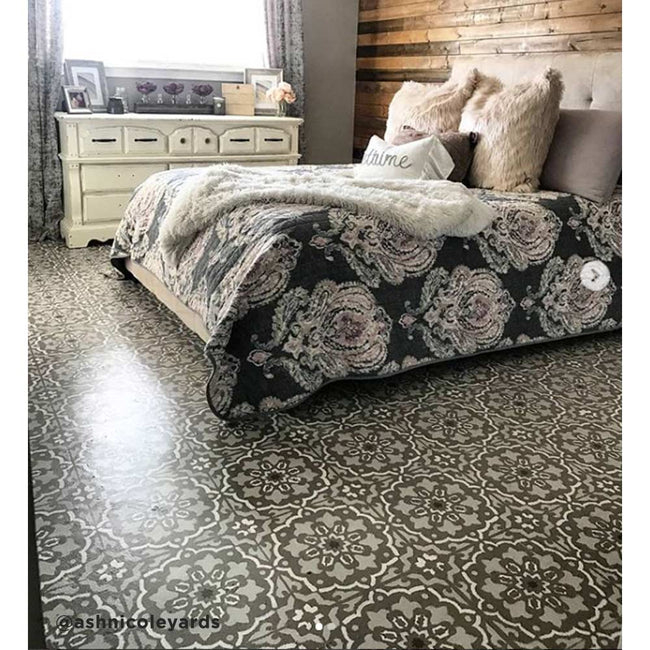
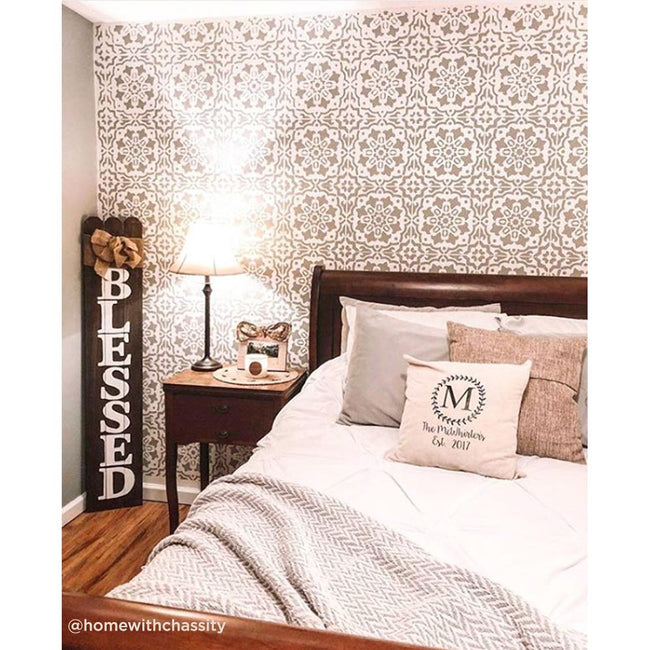
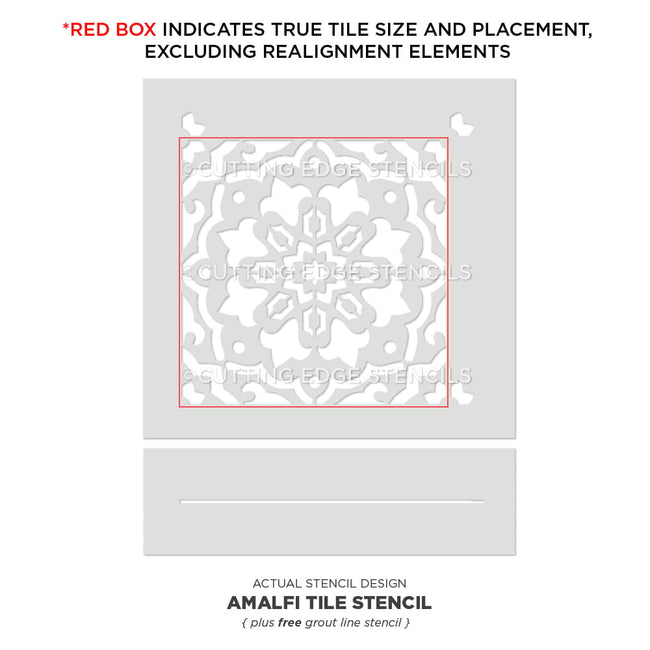
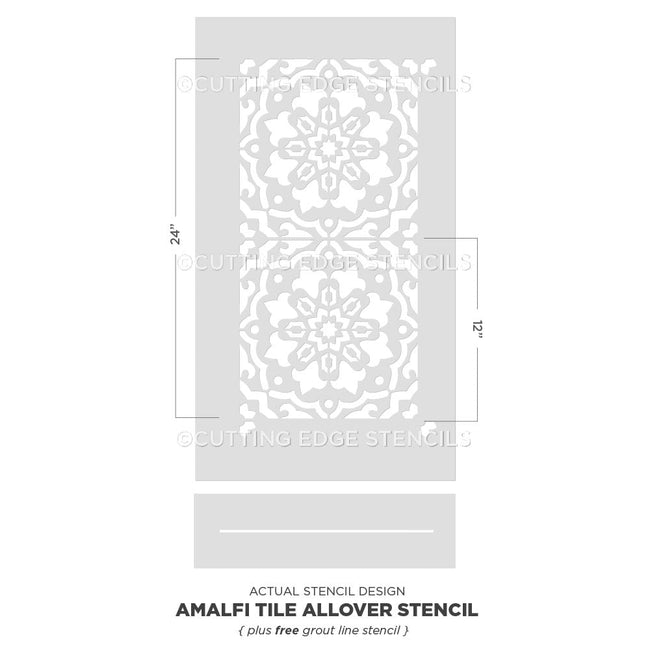
Cement tiles are all the rage in today's decor, but they are expensive and difficult to install. Luckily for a DIY enthusiast, we offer amazing tile stencils for floors, kitchen backsplashes and furniture! Now you can get that pinterest-worthy cement tile look for a fraction of the price of real tile. Our trendy Amalfi tile stencil features built-in registration for easy stencil alignment, and also comes with a free grout line stencil.
How to measure your tile: The size of our tile stencil designs are exactly as advertised. We currently offer them in 6", 8", 12", and 16". The grout line is NOT factored into those sizes. Before ordering, please measure your tile from tile edge to tile edge. Do NOT include the grout lines. If your tile is slightly larger/smaller than our listed dimensions, please contact customer service using Contact form.
The most trendy color combos include soft greys and taupes and also variations of traditional deep blue color. Use stencil brushes for a multi-color look, or simply roll with a dense foam roller for a monochromatic effect. This stencil will definitely make a statement in your space!
Larger tiles are best for the stenciled floors, but will look great on a wall too. Use smaller tiles for the backsplashes and stenciled stairs.
We also include a free Grout Line stencil to give your stenciled tiles that sharp, clean look!
Learn How to stencil a tile – it’s easy even for beginners!
We recommend purchasing two tile stencils for your project. Not only it will go faster, but you'll be able to get into tighter places and corners by cutting your spare tile stencil. You can certainly bend your stencil and still get to all the tight spots, but you know what we're sayin' - having two stencils makes your life much easier! :)
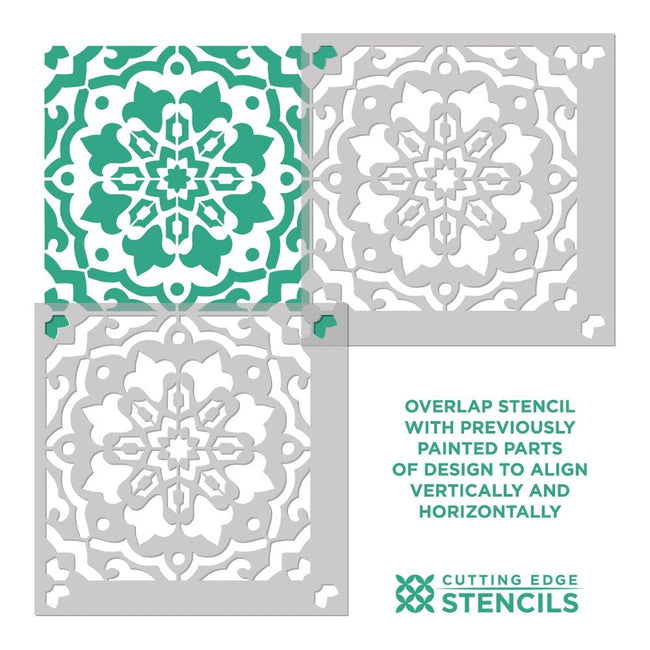
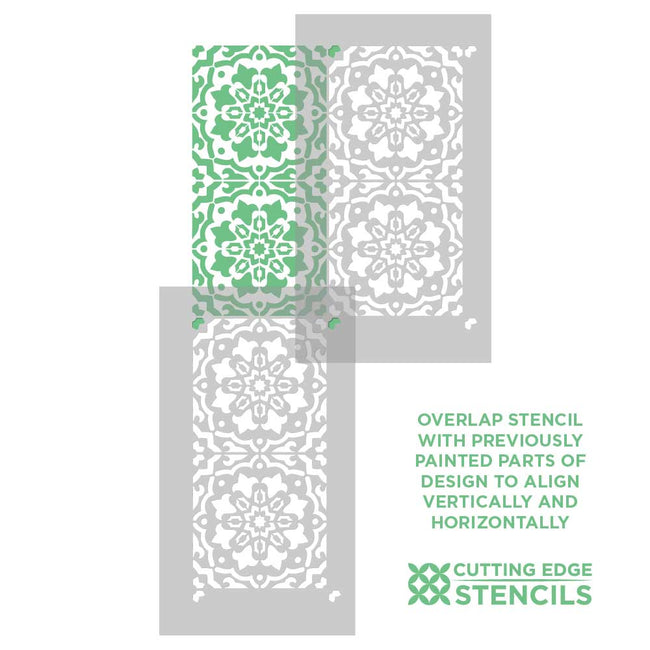
About registration marks: you can use them to align your tile stencil repeats, or not! It really depends on what surface you're stenciling. When stenciling over an existing old tile, the registration marks might not be helpful as the grout width varies from floor to floor. In this case, simply mask out the registration marks with pieces of blue tape, and align the stencil by eye by centering it on each old tile. If you are stenciling over a wall, or linoleum/cement floor - please use registration marks for easy alighnment of your tile stencil. Please see our alignment pic for reference.
For expert stenciling tips, please watch our How-to stencil videos! You'll find them extremely helpful for your stenciling project. Even beginners get great results!
Although most of our stencils do not require the use of spray adhesive, if your walls have a texture to them, it might be a good idea to use spray adhesive to help minimize paint seepage (Elmer's spray adhesive seems to be the best). Make sure you shake the can well and lightly mist (not drench) the stencil, and let it dry for a moment before positioning it on the wall. This step will prevent the adhesive residue transferring to the wall. You'll need to re-mist the stencil after a few repeats. Note: you will still need to hold the stencil in place with a few pieces of blue painters tape! Adhesive by itself is not enough to hold the stencil on the wall. Clean-up tip: Spray the stencil with Simple Green to help to remove adhesive residue and let it sit for a while before cleaning with soap and water. Please note that it is virtually impossible to get rid of all adhesive residue. That's why we personally prefer not to use it and just stick with painter's tape!
Stenciling on rough or textured walls may contribute to increased paint bleed. For more information on stenciling on textured walls, see our F.A.Q. section.
About seepage and imperfections: Even with a proper loaded roller and correct technique you might get some minor paint seepage here and there. In most cases it's not noticeable, especially from a couple of feet away and it can be easily touched up with a small brush. Don't forget that you're creating a "hand-painted wall finish". A few imperfections and some paint seepage here and there are natural and inevitable for this type of work. To avoid seepage, use spray adhesive and less paint on your roller and brush.
Our stencils are made to last and with proper care and storage will serve you for long time.
USPS can deliver most domestic packages within 3-5 business days (often sooner). For international packages, the delivery time is appr. 7-14 days. For Expedited shipping please select the options at the Checkout. Allow 1 business day for processing of all expedited orders.
30-DAY RETURNS
You can return your unused items within 30 days with no restocking fee. Questions? Please see our full Shipping and Returns Policy.
If you require custom size stencils, please contact us.
Choose options
Estimated Arrival: 3-5 business days
Free shipping over $100
Highest Quality Stencils
Safe checkout
Made in USA
Free shipping over $100
Highest Quality Stencils
Safe checkout
Made in USA
Cement tiles are all the rage in today's decor, but they are expensive and difficult to install. Luckily for a DIY enthusiast, we offer amazing tile stencils for floors, kitchen backsplashes and furniture! Now you can get that pinterest-worthy cement tile look for a fraction of the price of real tile. Our trendy Amalfi tile stencil features built-in registration for easy stencil alignment, and also comes with a free grout line stencil.
How to measure your tile: The size of our tile stencil designs are exactly as advertised. We currently offer them in 6", 8", 12", and 16". The grout line is NOT factored into those sizes. Before ordering, please measure your tile from tile edge to tile edge. Do NOT include the grout lines. If your tile is slightly larger/smaller than our listed dimensions, please contact customer service using Contact form.
The most trendy color combos include soft greys and taupes and also variations of traditional deep blue color. Use stencil brushes for a multi-color look, or simply roll with a dense foam roller for a monochromatic effect. This stencil will definitely make a statement in your space!
Larger tiles are best for the stenciled floors, but will look great on a wall too. Use smaller tiles for the backsplashes and stenciled stairs.
We also include a free Grout Line stencil to give your stenciled tiles that sharp, clean look!
Learn How to stencil a tile – it’s easy even for beginners!
We recommend purchasing two tile stencils for your project. Not only it will go faster, but you'll be able to get into tighter places and corners by cutting your spare tile stencil. You can certainly bend your stencil and still get to all the tight spots, but you know what we're sayin' - having two stencils makes your life much easier! :)
About registration marks: you can use them to align your tile stencil repeats, or not! It really depends on what surface you're stenciling. When stenciling over an existing old tile, the registration marks might not be helpful as the grout width varies from floor to floor. In this case, simply mask out the registration marks with pieces of blue tape, and align the stencil by eye by centering it on each old tile. If you are stenciling over a wall, or linoleum/cement floor - please use registration marks for easy alighnment of your tile stencil. Please see our alignment pic for reference.
For expert stenciling tips, please watch our How-to stencil videos! You'll find them extremely helpful for your stenciling project. Even beginners get great results!
Although most of our stencils do not require the use of spray adhesive, if your walls have a texture to them, it might be a good idea to use spray adhesive to help minimize paint seepage (Elmer's spray adhesive seems to be the best). Make sure you shake the can well and lightly mist (not drench) the stencil, and let it dry for a moment before positioning it on the wall. This step will prevent the adhesive residue transferring to the wall. You'll need to re-mist the stencil after a few repeats. Note: you will still need to hold the stencil in place with a few pieces of blue painters tape! Adhesive by itself is not enough to hold the stencil on the wall. Clean-up tip: Spray the stencil with Simple Green to help to remove adhesive residue and let it sit for a while before cleaning with soap and water. Please note that it is virtually impossible to get rid of all adhesive residue. That's why we personally prefer not to use it and just stick with painter's tape!
Stenciling on rough or textured walls may contribute to increased paint bleed. For more information on stenciling on textured walls, see our F.A.Q. section.
About seepage and imperfections: Even with a proper loaded roller and correct technique you might get some minor paint seepage here and there. In most cases it's not noticeable, especially from a couple of feet away and it can be easily touched up with a small brush. Don't forget that you're creating a "hand-painted wall finish". A few imperfections and some paint seepage here and there are natural and inevitable for this type of work. To avoid seepage, use spray adhesive and less paint on your roller and brush.
Our stencils are made to last and with proper care and storage will serve you for long time.
USPS can deliver most domestic packages within 3-5 business days (often sooner). For international packages, the delivery time is appr. 7-14 days. For Expedited shipping please select the options at the Checkout. Allow 1 business day for processing of all expedited orders.
30-DAY RETURNS
You can return your unused items within 30 days with no restocking fee. Questions? Please see our full Shipping and Returns Policy.
If you require custom size stencils, please contact us.
Overall rating: 4.9545455 / 5 from 22 reviews.
Review topics: [].
"I go this stencil quickly and used it to stamp ceramic tile for a trivet. The lines came out very clean. The stencil cleaned up easily."
"Used this design on a solid black 12 x 24 tile. The only issue was that our tiles were laid in an off set pattern which made the pattern of the stencils a bit off."
"We just did a commercial renovation and I thought using a solid black tile in the restrooms was going to be easier to keep clean. Wrong! Plus, the installers slopped thinset on the tiles leaving horrible looking blotches that wouldn't come off. It was the absolute worst choice possible! I started looking at painting the tile another color, and then I got the idea to stencil. I found Cutting Edge Stencils has 12 x 24 stencils which is the size of our tiles. Perfect! The designs are beautiful and they do a great job of hiding the blotches. We had 4 restrooms to do and it was hard tedious work and took several days. After watching a lot of tile stenciling videos, I decided to use brushes, rather than rollers to make sure there was no bleeding under. We painted directly onto the tile, no prepping needed. The paint dried almost immediately. After 24 hours we sprayed a matte finish sealer on."
"I had wanted to stencil my kitchen backsplash for years and I finally did it and I love how it turned out. It took me 40plus hours because I wanted it to be as perfect as possible. A few trials and errors but all worth it! Thank you!"
"The stencil was good quality and held up to several scrubbings. The registration makes made lining up the stencil very easy. Getting it right around the toilet was difficult and I felt like a contortionist at times but I am thrilled with how it turned out!"
"I loved this design. It really made my new fireplace stand out!"
"easy to use!"
"Very pleased with the way my patio turned out. I bought 2 stencils which helped as I had to clean it after each use. There was a little seepage since it was a concrete floor. Overall I love it."
"I love this stencil so much! The pattern looks so good! I bought it to stencil our back patio. I used the tutorial they had posted online which was very helpful. The only thing I struggled with was cleaning the stencils in between uses (It could be the paint I used--make sure you have the right paint thinner or cleaner). I found that wiping off the back in between each use helped prevent additional bleeding. I also purchased multiple double stencils and one single tile stencil (12x12). I'd recommend multiple stencils if you're doing a bigger project. I'd also recommend you get one of their stencil brushes-they are durable and worked much better than the ones I had found at my local craft store."
"The stencil looks fantastic! It was so easy to use, master, and clean. The stenciling "how to" book was incredibly helpful, and I definitely wouldn't have been as successful without it! I will definitely buy again if I do another stenciling project! Below is a picture of my dresser ends, using the stencil, and a stencil brush. I didn't try with the roller just yet, but the process was so slick that I will be more confident next time! Great price, great product."

Become a Cutting Edge Stencils insider! Get exclusive promotions, new product launches and sales directly to your inbox!